
What are animations?

Animations create an illusion of movement when we have images flowing in a certain sequence or order. In our last lesson on micro:bit, we saw how our LED lights could be used to make images. Those images were put in a certain order which we called a sequence.
Then, we used a loop that instructed that sequence to repeat for a certain amount of times so that our images appeared on our screen like an animation. This shows how coding can bring artistic ideas to life. In this lesson, we want to bring musical ideas to life.
Did you know?
The micro:bit has the ability to play music for us. The instrument that helps us give the micro:bit instructions is a keyboard. We don't need to have taken music lessons to start playing this keyboard. We can start making our own songs through code straight away.
Or we can work with our family at home to find some musical notes online that we can transfer to the micro:bit with code too. Before we start though, let’s get our brains warmed up again using the 'unplugged’ challenge below.

Try this out at home

What you will need: 3 x Pots/Pans (different shapes and sizes preferably), 3 x spoons (Wooden Spoon, Metal Spoon, Plastic Spoon/Spatula), Paper x 3, Notepad, Pen/Markers
1) Gather all of the equipment above.
2) Pair up a pot/pan with one of the spoons i.e. large pan with wooden spoon, small pot with metal spoon etc. Each of these pairs are now your instrument.
3) On a piece of paper, design a way that someone can quickly know what instrument to play by creating an instrument label. Be creative! Maybe each instrument label has a different symbol you have created. Maybe each label is a different colour. What can you come up with?
4) Place each label at your instrument.
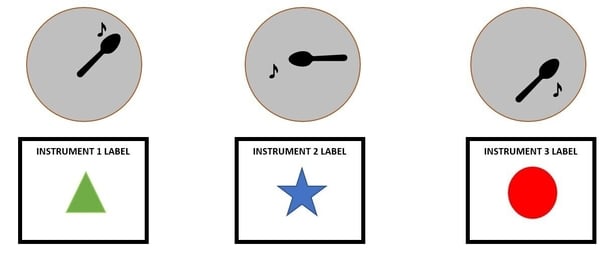
Here is what we have done below:
5) Now for the fun part! Come up with a song that you want someone in your house to play using your new instruments. Write down the sequence in which you want them to play these instruments by using your instrument label designs to guide them.
This is our sequence for our designs: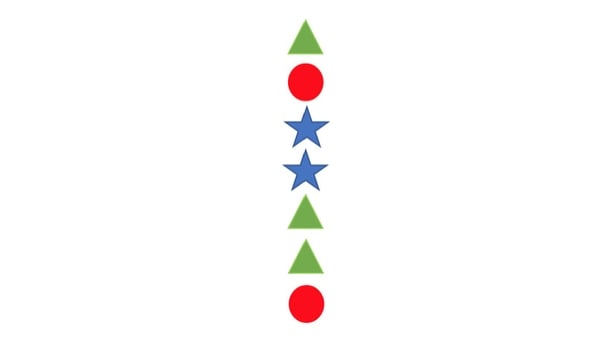
So, now that we can see how the sequence of musical instructions results in different outputs, let's go learn how we can do something similar with our micro:bit in lesson two!
So, now that you have learned about programming musical tones with our micro:bit, can you complete the home challenge before moving onto the next lesson. The DreamSpace team want you to create a new project at https://makecode.microbit.org and:
- Create your own song using MakeCode
- Or, recreate your favourite song using MakeCode
Download the PDF below to see some home challenge support guides including the musical notes of some songs you might know!
